programming4us


Applications Server

BizTalk 2010 Recipes: Business Rules Framework - Creating Facts

- Free product key for windows 10
- Free Product Key for Microsoft office 365
- Malwarebytes Premium 3.7.1 Serial Keys (LifeTime) 2019
4/29/2011 6:08:04 PM

1. Problem

You need to understand how to use the Facts Explorer to create a vocabulary that will be used within a business rule fact. You want to be able to store constants, predicates, and so on, that can be changed easily without redeploying code.

2. Solution

This solution will demonstrate how to create a vocabulary using a node in an imported XML schema. Facts are those items that are used to create rules. The Facts Explorer has four tabs, as follows:

  • Vocabularies: These consist of all defined values that you can use when creating a rule, including constants, predicates, XML nodes, and so on.

  • XML Schemas: You can use all schemas imported onto this tab when creating vocabularies or predicates (actions). You can drag and drop nodes on the XML Schemas tab in the Vocabulary window.

  • Databases: You can add references to databases that will be used for creating facts on this tab. You can drag and drop tables onto the Vocabulary window.

  • NET Assemblies: Assemblies, like databases and XML schemas, can be references in the Facts Explorer and used to create vocabularies.

Use the following steps to import an XML schema and create a new vocabulary:

  1. In the BizTalk Business Rule Composer, click the XML Schemas tab in the Facts Explorer.

  2. Right-click the Schemas folder, and select Browse. Locate a schema to import, and click Open. This imports the full schema into the window.

  3. Create a new vocabulary by clicking the Vocabulary tab. Right-click the Vocabularies folder, and select Add New Vocabulary. Give the vocabulary a name.

  4. Now, drag a node from the XML schema that was imported, and drop it on the vocabulary you created in the previous step. By holding down the mouse button as you drag the node, you can navigate between tabs.

  5. The Vocabulary Definition Wizard immediately opens, with the XML Document or Attribute option automatically selected. Navigate through the wizard to finish creating the vocabulary. The fields will already be filled in for you.

3. How It Works

You can add the Database and .NET Assembly facts to the Vocabulary tab in a similar manner as described in this solution. Additionally, you can drop all facts in the condition or action (IF...THEN) of a rule. 
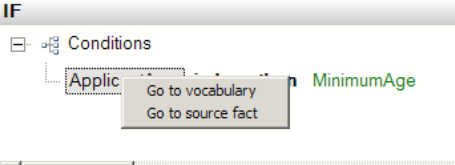
Once you have added a fact to a rule, right-clicking the condition or action allows you to browse to the original fact, as shown in Figure 1. Complex rules will have many facts referenced in them, and this allows you to keep track of all the disparate definitions.

Figure 1. Action with fact
Other -----------------
- BizTalk 2010 Recipes: Business Rules Framework - Creating and Testing Rules
- BizTalk 2010 Recipes: Business Rules Framework - Creating a Business Policy
- Exchange Server 2003 : Creating Public Folders (part 2)
- Exchange Server 2003 : Creating Public Folders (part 1)
- Exchange Server 2003 : Creating and Managing Address Lists and Recipient Policies (part 3) - Working with Offline Address Lists & Creating and Applying Recipient Policies
- Exchange Server 2003 : Creating and Managing Address Lists and Recipient Policies (part 2) - Administering Address Lists
- Exchange Server 2003 : Creating and Managing Address Lists and Recipient Policies (part 1) - Creating and Modifying Address Lists
- Microsoft Exchange Server 2003: Configuring Information Stores (part 2) - Moving Exchange Server 2003 Storage Groups and Databases
- Microsoft Exchange Server 2003: Configuring Information Stores (part 1) - Adding Storage Groups and Databases
- Microsoft Exchange Server 2003: Configuring Recipient Objects (part 9) - Managing Mail-Enabled Groups
- Microsoft Exchange Server 2003: Configuring Recipient Objects (part 8) - Moving Mailboxes with the Microsoft Exchange Mailbox Merge Wizard
- Microsoft Exchange Server 2003: Configuring Recipient Objects (part 7) - Moving Mailboxes with the Exchange Task Wizard
- Microsoft Exchange Server 2003: Configuring Recipient Objects (part 6) - Configuring Mailbox Permissions
- Microsoft Exchange Server 2003: Configuring Recipient Objects (part 5) - Configuring Storage Limits with Mailbox Store Policies
- Microsoft Exchange Server 2003: Configuring Recipient Objects (part 4) - Configuring Storage Limits for Individual Mailboxes
- Microsoft Exchange Server 2003: Configuring Recipient Objects (part 3)
- Microsoft Exchange Server 2003: Configuring Recipient Objects (part 2) - Managing Mailboxes
- Microsoft Exchange Server 2003: Configuring Recipient Objects (part 1) - Recipient Types
- Securing Exchange Server : Configure Message Hygiene Options (part 2) - Protect Against Unwanted Mail Sources
- Securing Exchange Server : Configure Message Hygiene Options (part 1) - Battle Unwanted Mail


Top 10
 
- Microsoft Visio 2013 : Adding Structure to Your Diagrams - Finding containers and lists in Visio (part 2) - Wireframes,Legends
- Microsoft Visio 2013 : Adding Structure to Your Diagrams - Finding containers and lists in Visio (part 1) - Swimlanes
- Microsoft Visio 2013 : Adding Structure to Your Diagrams - Formatting and sizing lists
- Microsoft Visio 2013 : Adding Structure to Your Diagrams - Adding shapes to lists
- Microsoft Visio 2013 : Adding Structure to Your Diagrams - Sizing containers
- Microsoft Access 2010 : Control Properties and Why to Use Them (part 3) - The Other Properties of a Control
- Microsoft Access 2010 : Control Properties and Why to Use Them (part 2) - The Data Properties of a Control
- Microsoft Access 2010 : Control Properties and Why to Use Them (part 1) - The Format Properties of a Control
- Microsoft Access 2010 : Form Properties and Why Should You Use Them - Working with the Properties Window
- Microsoft Visio 2013 : Using the Organization Chart Wizard with new data
- First look: Apple Watch

- 3 Tips for Maintaining Your Cell Phone Battery (part 1)

- 3 Tips for Maintaining Your Cell Phone Battery (part 2)
programming4us programming4us